
We recently custom-built an awesome-looking WordPress website that was a huge upgrade in quality from what the client had previously. Unfortunately, the high-quality images and functionality were taking at least 8-10 seconds to fully load. In today’s competitive market of limited attention spans and SEO rankings, 8-10 seconds is much too long.
To ensure an upgrade in website speed, we analyzed the site, identified the bottlenecks, and implemented a variety of changes, resulting in a final load time of 2-4 seconds: a reduction averaging 65-70%!
Want to know how we did it? Keep reading!
Identifying Bottlenecks
There are plenty of tools available to analyze your website, but the one we most highly recommend is Pingdom. We prefer this tool because it enables us to see a detailed analysis of where site load times are coming from – down to individual files that take the most time to load.
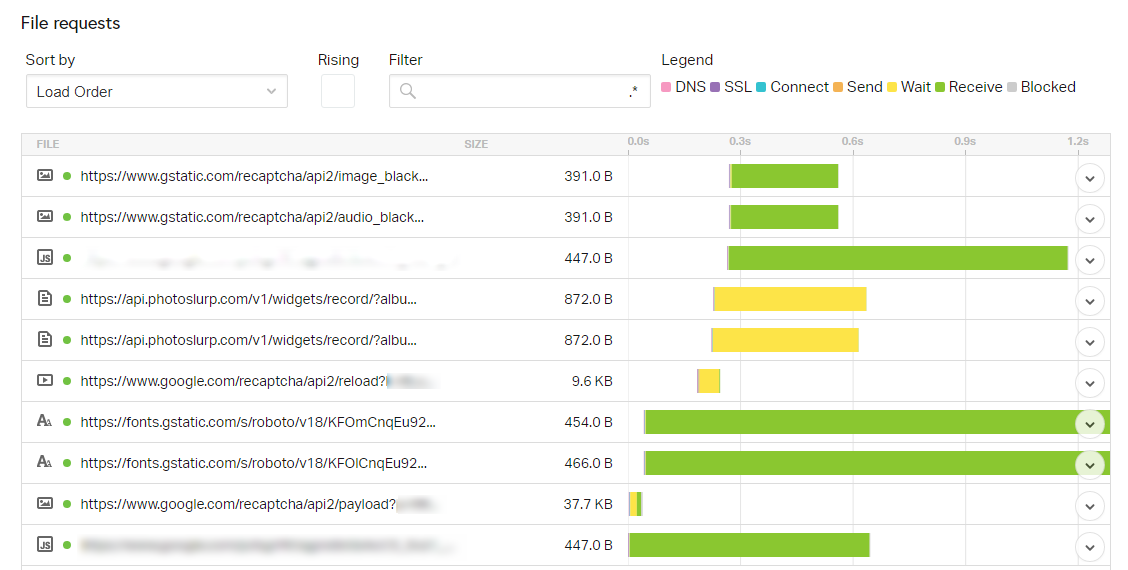
Using this tool, we were able to determine that most of the load time was being caused by the following factors:
- Hosting – several seconds were spent just on resolving the domain name
- Images – we had dozens of high-resolution images on each page
- Scripts, Stylesheets & Fonts – some of our CSS, jQuery, & fonts could be processed more efficiently
Implementing Solutions
Let’s start from the bottom up:
Scripts, Stylesheets & Fonts

If you’ve already done any sort of research into improving your website’s page speed, chances are you already know the basics about handling scripts & stylesheets. There are dozens of plugins available that will minify and/or compress your CSS & Javascript files. Installing a cache plugin to speed up your entire site can work wonders, too.
Sometimes, though, it helps to dig a little deeper and ask questions like these:
- Do you have CSS stylesheets loading in the footer? Try moving them into the header for faster performance
- Do you have external scripts loading in more than once? Try removing the duplicate references so each script is only pulled in once.
- For example, the site we were building had multiple Hubspot forms embedded on each page, and each form was pulling in the same base Hubspot Javascript. We reworked how we were pulling in those forms so that the base Javascript would only load once in the footer.
- Are your pages loading scripts/stylesheets that aren’t actually needed? If a Javascript file is only needed on a couple pages, only load it on those pages. No need for the rest of the site to get bogged down unnecessarily.
- Can you minimize the number of fonts you are using? Are you loading in fonts that you don’t actually need?
- In our case, we realized that the Hubspot forms were pulling in a font that wasn’t actually used anywhere. Unfortunately we couldn’t remove the reference altogether, so we took advantage of it by using it as the fallback for the site’s premium font. Then we were able to remove references to the previous fallback font, reducing unnecessary overhead.
Images

With dozens of images loading on almost every single page, it’s no wonder this site was struggling under the burden of a higher-than-average page weight. We needed a solution that would positively impact the load times, without negatively affecting the end-user’s experience.
The end result was a combination of a few different solutions:
#1: Image Resizing
The first thing to check for is whether you’re using the most optimally-sized images on your site. Generally speaking, you should never upload an image larger than 1920px wide to your website. In fact, you can usually get away with no larger than 1600px.
But even more specifically, if you’re loading in an image at its full 1920px resolution, but it’s only being displayed at about 900px max, then you should pull in a smaller version. WordPress automatically resizes all of your uploaded images into multiple versions, including Large (1024px wide), Medium (300px wide), and Thumbnail (150x150px), so that makes it easy for you to select the right dimensions for your needs.
#2: Image Compression
We always recommend compressing your images with a tool like tinyjpg.com before uploading them to your website. This will drastically reduce your image file sizes, often by around 70-80%, without negatively affecting their quality.
Another tip would be to save any non-transparent PNG’s as JPG’s instead, because they take up a LOT less space.
If you still need some extra help (which in our case, we did!), you can also consider installing a WordPress plugin like Smush to reduce image file sizes further.
#3: Lazy-Loading
For image-heavy sites like the one we were working on, image resizing & compression might not be enough. So another option is to implement lazy-loading – waiting until the page is fully loaded before displaying the images.
There are plugins available to handle this, including a3 Lazy Load and Zedna WP Image Lazy Load. Both of these offer lots of options to lazy-load your images, videos, and iframes. Zedna is also capable of handling background images as well.
In our case, most of the images we were concerned about were background images, but lazy-loading them created an obvious blink that wouldn’t look good from an end-user’s perspective. So we put our heads together and came up with a custom solution that worked perfectly.
Since we had complete control over the HTML on most of the image-intensive pages, we adjusted the key elements to store the background image as a data attribute, instead of as a style:
Content
We wrote a custom jQuery script that would wait for the page to fully load (or for the element to be scrolled to), and then use the data attribute to set the background image. To avoid the annoying blink that the end-user would end up seeing, we only applied this change to the elements that weren’t immediately visible.
This custom solution drastically cut down the load times by waiting to pull in most of the images until after page load, while minimizing/preventing any negative experience for the user.
Hosting & CDNs

The above changes that we’ve already outlined did quite a bit, cutting down our load times to between 3.5 and 4 seconds (by about 50-60%). But we wanted to get those load times down as much as possible, which led to our final recommendation: changing the host and implementing a Content Delivery Network (CDN).
If your hosting plan only costs a couple dozen dollars a month (or worse, is free!), then remember: you get what you pay for. If website speed is a top priority for you, then paying a higher premium for your hosting may be a necessary investment.
Another investment that may be worth your consideration is a Content Delivery Network (CDN) like Sucuri or Cloudflare. They will provide stronger caching levels, plus a host of security measures as an added bonus.
Upgrading our client’s hosting plan and setting up a CDN turned out to be the final key to improving their site speed, and there’s a high probability it may do the same for you!
We’re Here to Help!
If any of this sounds overwhelming, or you need the expertise of a developer to analyze your unique situation and optimize your site, we can help!
Give us a call at 908.989.0577, or fill out our contact form to get started!
About the author : Alisa Westerholm

Related Posts
Join our mailing list today
Insider offers & flash sales in your inbox every week.
[fusion_form form_post_id="2830" hide_on_mobile="small-visibility,medium-visibility,large-visibility" class="" id="" /]
Curabitur non nulla sit amet nisl tempus convallis quis ac lectus dolor sit amet, consectetur adipiscing elit sed porttitor lectus.